Energy Efficient Upgrades That Actually Cut Your Bills
Your energy bill arrives, and your heart sinks. Another $300 gone. You turn off lights religiously, adjust the thermostat constantly, and still, the numbers keep climbing. Meanwhile, your neighbor pays half what you do for a similar-sized house.
What’s the difference? They invested in the right energy upgrades, in the right order, at the right time.
Most articles won’t tell you this truth: throwing money at expensive solar panels or new windows might not save you a dime if your home is bleeding energy through your attic or leaky ducts. The order you make upgrades matters just as much as the upgrades themselves.
This article shows you exactly which energy efficient home upgrades deliver real savings, which ones to tackle first, and how to avoid the costly mistakes that trap most homeowners. Whether you have $200 or $20,000 to invest, you’ll walk away with a clear action plan.
Why Most People Waste Money on Energy Upgrades
Walk into any home improvement store, and you’ll see shelves packed with energy-saving products. Smart thermostats. LED bulbs. Solar panels. Window films. The options overwhelm you.
Most homeowners make a critical mistake. They see an advertisement for a fancy new upgrade, buy it immediately, and expect instant savings. Three months later, their bill barely budged.
The problem isn’t the products. It’s the approach.
Energy efficiency works like a chain. If one link is broken (like terrible insulation), fixing other links (like buying an expensive heat pump) won’t solve your problem. You’re pumping expensive heat into a house that can’t hold it.
Professional energy auditors know this. They start with what’s called the “building envelope” (your home’s outer shell: walls, roof, windows, doors) because that’s where most energy escapes. Only after sealing those leaks do they recommend upgrading mechanical systems.
This article follows that same proven approach. We’ll start with the foundation and build up strategically.
Before Spending Anything: Find Out Where Your Energy Goes
Before you spend a single dollar, you need to know where your money is going. Most utility companies offer free or low-cost energy audits. A professional comes to your home, runs tests (like a blower door test to find air leaks), and creates a customized report.
This audit typically costs $200 to $700 but saves you thousands in wasted upgrades. Some utility companies provide them free, especially for income-qualified households. Check the Department of Energy’s weatherization assistance program to see if you qualify for free services.
What the audit reveals:
- Where air is leaking (usually more places than you think)
- Whether your insulation is adequate
- How efficient your heating and cooling systems are
- Which upgrades will give you the biggest bang for your buck
If you can’t afford an audit right now, do a basic walk-through yourself. On a windy day, hold a lit incense stick near windows, doors, electrical outlets, and baseboards. If the smoke blows sideways, you’ve found an air leak.
Your utility bills also tell a story. Compare your usage to similar homes in your area (most utility websites show this). If you’re using 30% more energy than comparable homes, you have significant opportunities for savings.
Small Upgrades Under $500 That Pay Off Fast
These improvements cost little, require minimal skills, and start saving money immediately. Most pay for themselves within 6 to 12 months.
LED Light Bulbs ($50-$150)
Replace your top 10 most-used light bulbs with LEDs. Not all at once, just the ones that burn the longest each day (kitchen, living room, porch lights).
Each LED uses 75% less energy than old incandescent bulbs and lasts 15 to 25 years. If you’re still using traditional bulbs, you’re basically setting money on fire.
A single LED bulb saves about $80 in electricity over its lifetime. Replace 10 bulbs, and you save $800 over the next decade.
Air Sealing ($100-$300)
Grab caulk, weatherstripping, and spray foam from any hardware store. Spend a weekend sealing the obvious gaps:
- Around windows and door frames
- Where pipes and wires enter your home
- Around electrical outlets on exterior walls
- Along baseboards on exterior walls
- Around the attic hatch
This simple DIY project can reduce your heating and cooling costs by 5% to 30% per year. That’s $50 to $300 in annual savings for most homes.
Programmable or Smart Thermostat ($50-$250)
Install a thermostat that automatically adjusts temperature when you’re asleep or away. You’ll save 10% to 15% on heating and cooling without thinking about it.
The newer smart thermostats learn your schedule and adjust automatically. They pay for themselves in about 2 years through energy savings of $100 to $200 annually.
Water Heater Blanket and Pipe Insulation ($30-$50)
If your water heater is more than a few years old and sits in an unheated space (garage, basement), wrap it in an insulating blanket. Insulate the first 6 feet of hot water pipes coming out of the heater.
This reduces heat loss by 25% to 45%, saving $20 to $60 per year. It pays for itself in less than a year.
Low-Flow Showerheads and Faucet Aerators ($20-$60)
Swap old showerheads for low-flow versions and add aerators to bathroom and kitchen faucets. You’ll use 30% to 50% less hot water without noticing any difference in pressure.
Annual savings: $50 to $150 on water heating costs. Payback period: 3 to 6 months.
Small Upgrade Total Investment: $250 to $760
Expected Annual Savings: $270 to $810
Payback Period: 10 months to 3 years
Medium Investments: $500 to $3,000 (1-4 Year Payback)
After handling the small upgrades, these mid-range improvements deliver substantial long-term value.
Attic Insulation ($1,000-$2,500)
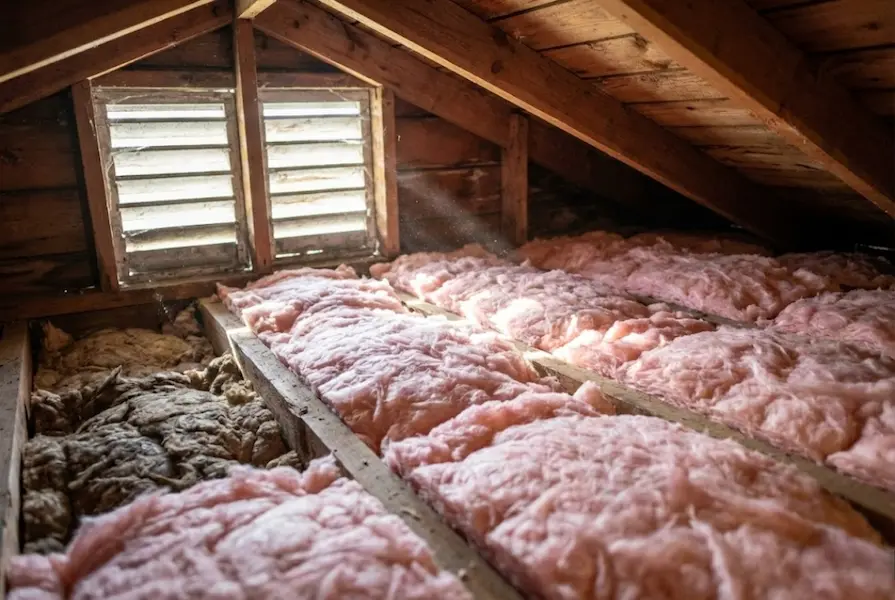
Your attic is where most homes lose energy. Heat rises, and without proper insulation, it escapes right through your roof in winter. In summer, your attic turns into an oven and radiates heat down into your living space.
Adding or upgrading attic insulation can cut your heating and cooling costs by up to 50%. Aim for an R-value of at least R-38.
Most attics have far less insulation than needed. If you can see the floor joists in your attic, you definitely need more.
DIY or hire a professional? Adding blown-in insulation is relatively easy for handy homeowners. Proper air sealing before insulation requires more skill and equipment.
Annual savings: $300 to $600
Payback period: 2 to 4 years
Duct Sealing and Insulation ($300-$1,500)
If you have forced-air heating and cooling, your ductwork might be throwing away 30% of your heated or cooled air before it even reaches your rooms. Leaky ducts hidden in attics, crawl spaces, or basements waste enormous amounts of energy.
Professional duct sealing uses special equipment and tape (not regular duct tape, which ironically fails on ducts). The cost depends on your home’s size and duct accessibility.
Annual savings: $200 to $500
Payback period: 1 to 3 years
Window Treatments and Films ($200-$1,000)
Before replacing windows (expensive), try insulating window treatments. Cellular shades, thermal curtains, or window films can reduce heat loss through windows by 25% to 60%.
These work especially well for renters who can’t modify the actual windows. They’re removable, affordable, and surprisingly effective.
For homeowners, adding storm windows costs less than full replacement and provides similar benefits at a fraction of the price.
Annual savings: $100 to $300
Payback period: 1 to 4 years
High-Efficiency Ceiling Fans ($150-$500 for multiple rooms)
Modern ceiling fans with DC motors use 70% less energy than old models while moving air more efficiently. Used properly, they let you raise your thermostat 4 degrees in summer (and lower it in winter) without losing comfort.
This might sound backwards, but ceiling fans in winter help. Run them in reverse (clockwise) on low speed. They push warm air down from the ceiling where it collects.
Annual savings: $100 to $200
Payback period: 1 to 3 years
Smart Power Strips ($25-$100)
“Phantom loads” happen when devices draw power even when turned off. TVs, game consoles, cable boxes, computers, and chargers all sip electricity 24/7.
Smart power strips cut power to multiple devices with one switch or automatically when devices go into standby mode.
Annual savings: $50 to $150
Payback period: 6 months to 2 years
Medium Investment Total: $1,675 to $5,600
Expected Annual Savings: $750 to $2,250
Payback Period: 1 to 4 years
Major Upgrades: $3,000+ (4-10 Year Payback)
These big-ticket items require serious investment but deliver the highest long-term savings. Only consider them after handling the smaller and medium investments.
Heat Pump System ($5,000-$15,000 after rebates)
Heat pumps completely change how you think about heating and cooling. They work like air conditioners but in reverse, providing both heating and cooling. Instead of burning fuel to create heat, they move heat from one place to another, using far less energy.
When should you get a heat pump?
- You heat with oil, propane, or electric resistance (baseboard heaters)
- Your current heating or cooling system is dying
- You’ve already sealed and insulated your home
When heat pumps make less sense:
- You have cheap natural gas heating
- Your home has major air leaks and poor insulation
- You live in extremely cold climates (though newer cold-climate heat pumps work down to -15°F)
Average savings:
- Replacing oil or propane heating: $700 to $900 per year
- Replacing electric resistance: $600 to $800 per year
- Replacing natural gas: $60 to $150 per year
Federal tax credits cover up to $2,000, and many states offer additional rebates of $1,000 to $5,000.
Payback period: 5 to 10 years
Heat Pump Water Heater ($1,200-$3,500 after rebates)
Your water heater is typically your second-largest energy user after heating and cooling. Traditional tank water heaters waste energy keeping 50 gallons of water hot 24/7, whether you use it or not.
Heat pump water heaters use 50% to 70% less energy by extracting heat from the surrounding air. They work best in warm spaces like garages or basements.
A family of four saves about $300 to $550 per year compared to traditional electric water heaters. Federal tax credits cover 30% of costs up to $2,000.
Payback period: 3 to 6 years
Energy-Efficient Windows ($5,000-$15,000 for whole-home replacement)
New windows are expensive and often oversold. The truth: windows usually aren’t your biggest energy problem.
Only replace windows if:
- Your current windows are broken or rotting
- You’ve already sealed, insulated, and upgraded your HVAC
- You have single-pane windows in a harsh climate
Double or triple-pane windows with low-E coatings and insulating gas reduce heat loss significantly. However, even the best windows provide less insulation value than a well-insulated wall.
Average savings: $125 to $465 per year (12% average reduction in energy bills)
Payback period: 10 to 30 years for savings alone (but consider comfort and home value)
Federal tax credits cover up to $600 total for all windows and skylights.
Solar Panels ($15,000-$25,000 after tax credits)
Solar panels are sexy. They look high-tech, they’re environmentally friendly, and you see them on more roofs every year. But are they right for you?
Only install solar panels after you’ve made your home efficient. Why? Because efficient homes need smaller solar systems, which cost less and pay back faster.
Key questions before going solar:
- Does your roof get good sun exposure?
- Is your roof in good condition (replacing a roof after installing solar is expensive)?
- Do you plan to stay in your home for at least 7 years?
- Have you made your home efficient first?
After a 30% federal tax credit, typical payback period: 7 to 12 years
Annual savings: $600 to $2,000 depending on electricity rates and system size
Over 25 years, most homeowners save $20,000 to $90,000.
Major Investment Total: $3,000 to $30,000+
Expected Annual Savings: $600 to $3,000+
Payback Period: 4 to 15 years
Energy Upgrade Payback Comparison Table
| Upgrade | Cost | Annual Savings | Payback Period | DIY Possible? |
|---|---|---|---|---|
| LED Bulbs | $50-$150 | $80-$120 | Under 1 year | Yes |
| Air Sealing | $100-$300 | $50-$300 | 1-2 years | Yes |
| Smart Thermostat | $50-$250 | $100-$200 | 1-2 years | Yes |
| Water Heater Blanket | $30-$50 | $20-$60 | Under 1 year | Yes |
| Low-Flow Fixtures | $20-$60 | $50-$150 | 3-6 months | Yes |
| Attic Insulation | $1,000-$2,500 | $300-$600 | 2-4 years | Sometimes |
| Duct Sealing | $300-$1,500 | $200-$500 | 1-3 years | Sometimes |
| Window Treatments | $200-$1,000 | $100-$300 | 1-4 years | Yes |
| Ceiling Fans | $150-$500 | $100-$200 | 1-3 years | Yes |
| Smart Power Strips | $25-$100 | $50-$150 | 6 months-2 years | Yes |
| Heat Pump HVAC | $5,000-$15,000 | $600-$900 | 5-10 years | No |
| Heat Pump Water Heater | $1,200-$3,500 | $300-$550 | 3-6 years | No |
| Energy-Efficient Windows | $5,000-$15,000 | $125-$465 | 10-30 years | No |
| Solar Panels | $15,000-$25,000 | $600-$2,000 | 7-12 years | No |
Common Mistakes That Cost You Money
Avoid these traps that catch most homeowners:
Mistake 1: Skipping the Foundation
Installing a fancy new heating system in a leaky, poorly insulated house is like filling a bucket with holes. Fix the building envelope first (insulation, air sealing) or you’ll waste money on an oversized, inefficient system.
Professional installers often oversize equipment when homes aren’t properly sealed. You pay more upfront and your system runs less efficiently.
Mistake 2: Believing the “Miracle” Product Hype
Beware of products claiming 50% savings with minimal effort. Window films, attic fans, whole-house fans, and similar products rarely deliver promised results. Stick to proven upgrades backed by independent testing.
Mistake 3: Ignoring Maintenance
The most efficient furnace in the world won’t save you money if the filter is clogged. Change HVAC filters monthly, clean refrigerator coils annually, and maintain your equipment according to manufacturer specifications.
Poor maintenance can reduce equipment efficiency by 20% to 30%.
Mistake 4: DIY-ing Jobs That Need Professionals
Air sealing around windows? Great DIY project. Installing a heat pump? Terrible idea unless you’re a licensed HVAC technician.
Incorrectly installed equipment voids warranties, wastes energy, and can be dangerous. Know your limits.
Mistake 5: Forgetting About Rebates and Tax Credits
Federal tax credits, state rebates, and utility incentives can cover 30% to 50% of your costs for many upgrades. Research before you buy.
The DSIRE database tracks all state and local incentives. Some programs require pre-approval, so check before installation.
Mistake 6: Replacing Windows Before Everything Else
Windows are often the first thing homeowners want to replace. They’re visible, they feel drafty, and salespeople love selling them. But windows usually deliver the worst return on investment for energy savings.
Fix insulation, air sealing, and HVAC first. Then reassess whether you still need new windows.
Mistake 7: Not Considering Payback Period
A $20,000 solar system that saves $800 per year takes 25 years to pay back. If you’re planning to sell your house in 5 years, that math doesn’t work.
Always calculate realistic payback periods before making major investments.
Special Considerations for Renters
Most of this article assumes you own your home. But renters can still dramatically reduce energy bills:
What renters CAN do:
- Replace bulbs with LEDs (take them when you move)
- Install smart thermostats (easily removable)
- Add weatherstripping and removable caulk
- Use window films and thermal curtains
- Add door sweeps
- Install smart power strips
- Request maintenance for obvious problems
What requires landlord approval:
- Major insulation work
- Window replacement
- HVAC upgrades
- Permanent modifications
Many states require landlords to maintain functioning heating and cooling systems. If yours is ancient and inefficient, document the problem and request an upgrade. Frame it as a maintenance issue, not just an energy concern.
Your Action Plan: Where to Start Today
Feeling overwhelmed? Follow this simple roadmap:
This Weekend (Under $100)
- Replace your 5 most-used light bulbs with LEDs
- Install door sweeps and add weatherstripping
- Lower your water heater temperature to 120°F
- Clean refrigerator coils
- Caulk obvious gaps around windows and doors
This Month ($100-$500)
- Install a smart thermostat
- Add insulation to hot water pipes
- Buy and install low-flow fixtures
- Seal major air leaks you can see
- Install smart power strips for entertainment centers
Next 6 Months ($500-$3,000)
- Schedule a professional energy audit
- Add or upgrade attic insulation based on audit results
- Have ducts professionally sealed if needed
- Add window treatments to problem windows
- Replace old ceiling fans with efficient models
Year 1-2 (If Needed, $3,000+)
- Replace dying HVAC with high-efficiency heat pump
- Upgrade water heater when current one fails
- Consider solar panels only after efficiency upgrades
- Replace windows only if necessary (last priority)
How Much Money Will You Actually Save?
Take a look at real numbers for typical scenarios:
Scenario 1: The Small Upgrade House
Home: 1,500 sq ft, decent insulation, no major issues
Current annual energy cost: $2,400
Upgrades: LED bulbs, air sealing, smart thermostat, water heater insulation, low-flow fixtures
Total investment: $500
New annual energy cost: $1,980
Annual savings: $420
Payback: 1.2 years
Scenario 2: The Medium Makeover
Home: 2,000 sq ft, poor attic insulation, leaky ducts
Current annual energy cost: $3,200
Upgrades: All small upgrades + attic insulation + duct sealing + window treatments
Total investment: $4,000
New annual energy cost: $2,080
Annual savings: $1,120
Payback: 3.6 years
Scenario 3: The Full Overhaul
Home: 2,500 sq ft, old HVAC, poor insulation, inefficient appliances
Current annual energy cost: $4,800
Upgrades: All small upgrades + medium investments + heat pump HVAC + heat pump water heater
Total investment: $12,000 (after rebates)
New annual energy cost: $2,640
Annual savings: $2,160
Payback: 5.6 years
After payback, you pocket that $2,160 every single year for decades.
Frequently Asked Questions
What’s the single best energy upgrade for most homes?
Attic insulation and air sealing provide the best return for most homes. They’re relatively affordable, have short payback periods, and benefit every other system in your house.
Should I get solar panels?
Only after making your home efficient. Efficient homes need smaller, cheaper solar systems that pay back faster. Solar makes most sense if you plan to stay in your home for at least 7 to 10 years and have good roof exposure.
How long do energy upgrades take to pay back?
It varies widely. Simple upgrades like LED bulbs pay back in months. Major upgrades like windows or solar panels take 10 to 15 years. Focus on upgrades with payback periods under 5 years for the best results.
Can I DIY energy upgrades?
Many yes, some no. DIY air sealing, LED bulbs, thermostats, insulation (in some cases), and window treatments. Hire professionals for HVAC work, major electrical, complex air sealing, and anything you’re not confident doing safely.
What rebates and tax credits are available?
Federal tax credits cover 30% of costs up to $3,200 per year for many upgrades (through 2032). State and utility rebates vary by location but can add thousands more.
Will energy upgrades increase my home’s value?
Yes, but not dollar-for-dollar. Energy-efficient homes sell faster and for 2% to 8% more than comparable inefficient homes. Some upgrades (like solar panels) add more value than others (like new HVAC).
What if I’m selling my house soon?
Focus on low-cost, high-visibility upgrades like LED bulbs and smart thermostats. Skip expensive upgrades with long payback periods unless they’re needed for the sale.
How much can I realistically save?
Most homeowners reduce energy costs by 20% to 40% through smart upgrades. That translates to $400 to $1,600 per year for average households. Extreme cases save 50% or more.
Do energy-efficient upgrades really pay for themselves?
Yes, if you choose wisely. Small upgrades and medium investments typically pay back in 1 to 5 years. Major upgrades take longer but provide value for 15 to 30 years. Poor choices (like expensive windows when you need insulation) might never pay back.
What upgrades qualify for tax credits in 2025?
Through December 31, 2025, you can claim 30% of costs for qualifying upgrades including insulation, air sealing, efficient HVAC systems, heat pump water heaters, and more. Limits apply: $1,200 annual cap for most improvements, $2,000 for heat pumps and biomass equipment, $600 for windows, $150 for energy audits. File IRS Form 5695 with your tax return.
The Bottom Line
Energy efficient home upgrades aren’t magic. They’re math.
Every dollar you invest should return more than a dollar in energy savings over time. The key is choosing the right upgrades in the right order for your specific situation.
Start small. Fix the obvious problems first. Air sealing and insulation beat fancy equipment every time. Only after your home can hold the energy you pay for should you upgrade the equipment that creates that energy.
Most importantly, take action. Your energy bill won’t shrink by itself. But with a smart plan and the right upgrades, you can cut your energy costs by hundreds or even thousands of dollars per year.
Ready to start saving? Walk through your home today with this article in hand. Find three things you can tackle this weekend. Your future self will thank you every time that energy bill arrives.
The best time to start was yesterday. The second-best time is right now.