How to Fix Cakey Foundation on Dry Skin (Works in Minutes)
You’re standing in front of the mirror, and your heart sinks. Your foundation looked perfect when you first applied it, but now? It’s clinging to every dry patch, settling into fine lines, and making your skin look like a cracked desert instead of smooth and glowing.
I get it. You’ve tried every trick in the book. You’ve watched countless tutorials, bought expensive foundations, and followed all the standard advice. Yet your makeup still looks cakey by lunchtime, and you’re tired of feeling like you can’t get it right.
The thing is, most foundation advice treats all skin types the same. But dry skin needs a completely different approach. If you’ve been following generic tips meant for oily or combination skin, no wonder nothing’s working!
In this article, I’m going to show you exactly how to fix cakey foundation when you have dry skin, and more importantly, how to prevent it from happening in the first place. These aren’t just band-aid solutions. These are real, tested strategies that work specifically for dry skin.
Emergency Fixes: Your Foundation Looks Cakey Right Now
Let’s start with the urgent stuff. Your foundation is already cakey, you’re about to leave the house, and you need to fix it fast. What should you do:
Step 1: Don’t Touch It With Your Fingers
I know it’s tempting to try rubbing or blending those cakey spots with your fingers, but stop! This will only make it worse. Your fingers will remove more foundation, create uneven patches, and spread the problem around.
Step 2: Grab a Hydrating Face Mist
Spray a hydrating face mist directly onto your face from about 6 inches away. Use 2-3 spritzes. The mist will add moisture back to your skin and help “melt” the foundation so it looks more natural. If you don’t have a face mist, you can lightly spray some water on a makeup sponge instead.
Step 3: Use a Damp Beauty Sponge
Take a clean beauty sponge (like a Beauty Blender) and dampen it with water. Squeeze out the excess so it’s moist but not dripping. Then, gently press and roll the sponge over the cakey areas. Don’t drag or swipe. Just press and roll. This technique helps blend the foundation back into your skin without removing all your hard work.
Step 4: Add a Tiny Bit of Facial Oil
If the cakiness is really stubborn, put one small drop of facial oil on your fingertip and gently pat it onto the problem areas. I’m talking about a drop the size of a grain of rice. This instantly adds moisture and helps smooth everything out. Jojoba oil, squalane, or any lightweight facial oil works perfectly.
Step 5: Seal It With Setting Spray
Once you’ve smoothed everything out, finish with a dewy setting spray. This locks your makeup in place and gives your skin that fresh, just-applied look. Avoid matte setting sprays because they’ll just dry out your skin more.
These five steps should rescue your makeup in under two minutes. But let’s be honest, constantly fixing cakey foundation gets old fast. Let’s talk about why this keeps happening so you can stop it for good.
Why Does Foundation Look So Cakey on Dry Skin?
Understanding the problem is half the battle. When you have dry skin, several things happen that make foundation look cakey:
Your Skin Has Invisible Flaky Patches
Even if your skin looks smooth to you, dry skin often has microscopic flakes and rough texture that you can’t see until you apply foundation. When foundation sits on top of these flakes, it creates that dreaded cakey, patchy look. Think of it like trying to paint over a rough wall. The paint won’t look smooth because the surface underneath isn’t smooth.
Your Skin Sucks Up Moisture Like a Sponge
Dry skin is constantly thirsty. When you apply foundation, your skin literally absorbs the moisture from the product, leaving behind a thick, concentrated layer of pigment. This is why your foundation might look fine at first but gets cakey after 30 minutes. Your skin has drunk up all the good stuff and left the heavy stuff sitting on top.
Dead Skin Cells Are Creating Barriers
Dry skin doesn’t shed dead cells as efficiently as other skin types. These dead cells build up on the surface, creating tiny barriers that prevent foundation from blending smoothly. Instead of melting into your skin, the foundation just sits on top of this layer of dead cells, looking thick and obvious.
You’re Probably Using the Wrong Products
Most drugstore foundations are designed for normal to oily skin because that’s the majority of people. If you have dry skin and you’re using these products, they’re actively working against you. They contain ingredients that mattify and control oil, which is the opposite of what dry skin needs.
Now that you understand what’s causing the problem, let’s fix it permanently.
How to Prevent Cakey Foundation Before It Starts
This is where the magic happens. Follow these steps in order, and you’ll see a huge difference in how your foundation looks and lasts.
Step 1: Exfoliate Regularly (But Gently)
You need to get rid of those dead skin cells, but harsh scrubs will only make your dry skin worse. Instead, use a gentle chemical exfoliant 2-3 times a week. Look for products with lactic acid or PHA (polyhydroxy acids). According to the American Academy of Dermatology, chemical exfoliants dissolve dead skin cells without the irritation that physical scrubs can cause on sensitive, dry skin.
Skip the physical scrubs with beads or rough textures. They create micro-tears in dry skin and make the problem worse. Think gentle, not aggressive.
Step 2: Hydrate Your Skin Like Your Life Depends on It
This is the most important step for dry skin. You need to flood your skin with moisture before you even think about foundation. What to do:
- Apply a hydrating serum with hyaluronic acid right after cleansing. Hyaluronic acid holds 1,000 times its weight in water, which is exactly what dry skin needs.
- While your skin is still damp from the serum, apply a rich moisturizer. Look for ingredients like ceramides, glycerin, or squalane. Give this at least 5 minutes to fully absorb before moving to the next step.
- If your skin is extremely dry, add a few drops of facial oil on top of your moisturizer. This creates a protective barrier and gives you that dewy, glowing base.
I know 5 minutes feels like forever when you’re rushing in the morning, but this wait time is crucial. If you apply foundation on top of wet moisturizer, everything will slide around and look cakey.
Step 3: Choose the Right Primer
For dry skin, you want a hydrating or luminous primer. Skip anything labeled “mattifying” or “pore-minimizing” because those are designed to absorb oil, which you don’t have.
Apply primer only where you need it. You don’t have to cover your entire face. Focus on areas that tend to get cakey, like around your nose, chin, and any spots with visible texture.
Step 4: Pick the Right Foundation Formula
This is huge. The type of foundation you use makes all the difference. What works for dry skin:
Liquid Foundations with Hydrating Formulas
These are your best friend. Look for words like “hydrating,” “luminous,” “radiant,” or “dewy” in the name. Avoid anything that says “matte” or “oil-free.”
Serum Foundations
These are basically skincare mixed with foundation. They’re incredibly lightweight and usually contain ingredients like hyaluronic acid. Perfect for dry skin that needs extra moisture.
Tinted Moisturizers
If you prefer light coverage, tinted moisturizers are ideal. They give you a bit of color while continuing to hydrate your skin throughout the day.
What to Avoid
Stay away from powder foundations, matte liquid foundations, and anything labeled “long-wear” or “transfer-proof.” These formulas are designed to stay put by drying down, which is terrible for dry skin.
Step 5: Apply Foundation the Right Way
How you apply foundation is just as important as which foundation you use. Follow this technique:
- Put a small amount of foundation on the back of your hand. I mean really small, like a pea-sized amount. You can always add more, but you can’t easily remove it if you use too much.
- Use a damp beauty sponge to apply the foundation. Dampen it with water and squeeze out the excess. The sponge should feel cool and slightly moist.
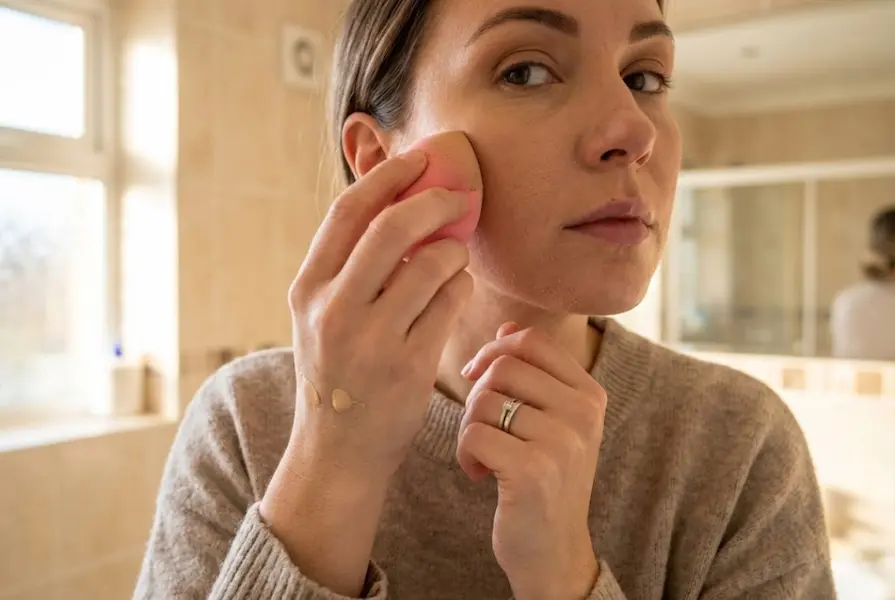
- Dab the sponge into the foundation on your hand and bounce it onto your face. Start from the center and work outward. Use a bouncing, pressing motion, not a dragging or swiping motion.
- Build coverage gradually. Apply one thin layer, let it set for a minute, then add another layer only where you need more coverage.
- Pay extra attention to dry patches. If you have any flaky spots, gently press the damp sponge over them without applying more foundation. The moisture from the sponge will help smooth things out.
Step 6: Set Your Makeup Carefully
This is where most people with dry skin go wrong. They apply powder all over their face, which immediately makes everything look dry and cakey.
Instead, only use powder where you actually need it. For most people with dry skin, that’s just the T-zone (forehead, nose, chin). Use a fluffy brush, dip it lightly in translucent powder, tap off the excess, and gently press it into those areas.
Better yet, skip powder entirely and use a hydrating setting spray. This locks your makeup in place without adding any drying ingredients.
Step 7: Refresh Throughout the Day
Even with perfect application, dry skin can start to look tight and cakey after a few hours. Keep a small hydrating mist in your bag and spritz your face whenever it starts to feel dry. This instantly refreshes your makeup and brings back that dewy glow.
The Right Foundation Types for Dry Skin
Let me break down which foundation formulas work for dry skin so you can make smart choices:
| Foundation Type | Works For | Why It’s Good | What It Looks Like |
|---|---|---|---|
| Hydrating Liquid Foundation | Everyday wear, medium coverage | Contains moisturizing ingredients that continue to hydrate throughout the day | Natural, glowing finish |
| Serum Foundation | Light to medium coverage, very dry skin | Packed with skincare ingredients like hyaluronic acid and vitamins | Fresh, dewy, skin-like finish |
| Tinted Moisturizer | Light coverage, minimal makeup days | Gives you color while treating your skin like a moisturizer | Sheer, natural, barely-there |
| Cream Foundation | Full coverage, special events | Rich, emollient texture that doesn’t emphasize dryness | Satin, polished finish |
| BB/CC Cream | Light coverage with skincare benefits | Combines hydration, SPF, and light coverage in one step | Natural, even, slightly glowy |

What to Look for in Ingredients:
- Hyaluronic acid (holds moisture)
- Glycerin (attracts water to skin)
- Squalane (mimics skin’s natural oils)
- Ceramides (repair skin barrier)
- Vitamin E (nourishes and protects)
What to Avoid:
- Alcohol (extremely drying)
- Heavy silicones (can emphasize texture)
- Talc (absorbs moisture)
- Clay (meant for oily skin)
The Right Tools Make All the Difference
Using the right tools can completely change how your foundation looks. What works for dry skin:
Damp Beauty Sponge (Your Go-To)
A damp beauty sponge is hands-down the number one tool for applying foundation on dry skin. The moisture in the sponge adds hydration while you apply, and the bouncing motion presses foundation into your skin instead of just wiping it on top. Replace your sponge every 3 months or when it starts to tear.
Your Fingers (Great for Quick Application)
Don’t underestimate the power of your fingers. The warmth from your hands helps melt the foundation into your skin, creating a natural finish. This works especially well with dewy liquid foundations. Just make sure your hands are clean first!
Flat-Top Kabuki Brush (Good for Building Coverage)
If you prefer brushes, use a flat-top kabuki brush with soft, dense bristles. Apply foundation in circular, buffing motions. The key is to use a stippling motion (pressing and lifting) rather than dragging the brush across your skin.
What to Avoid:
Skip those flat, paddle-shaped foundation brushes. They tend to leave streaks on dry skin and can disturb any flaky patches. Also avoid small, firm brushes that are too rough for dry, sensitive skin.
Common Mistakes That Make Cakey Foundation Worse
Even if you’re doing everything right, these sneaky mistakes can sabotage your makeup:
Mistake 1: Skipping Moisturizer Because You’re Using Hydrating Foundation
Your foundation is not a substitute for moisturizer. Even the most hydrating foundation can’t replace proper skincare. Always moisturize first and let it absorb completely before applying foundation.
Mistake 2: Using Too Much Product
More foundation does not equal better coverage. It just equals more caking. Start with way less than you think you need. You can always add more, but removing excess is messy and ruins your work.
Mistake 3: Not Giving Products Time to Absorb
Rushing through your routine is the enemy of good makeup. Give your moisturizer 5 minutes to sink in before primer. Give your primer 2-3 minutes before foundation. This prevents products from mixing together and creating a slippery, cakey mess.
Mistake 4: Using Matte Products
I can’t stress this enough. If you have dry skin, matte products are not your friend. Matte formulas work by absorbing oil and moisture, which you don’t have. This makes everything look dry, flat, and cakey.
Mistake 5: Applying Foundation to Dirty Brushes or Sponges
Old makeup and bacteria build up in your tools, creating a rough, uneven texture that makes foundation apply patchily. Wash your beauty sponge after every use with gentle soap and water. Clean brushes at least once a week.
Mistake 6: Setting Your Entire Face with Powder
Only use powder on areas that actually get oily. For most people with dry skin, that’s just the T-zone or maybe not at all. Powder sitting on dry skin is a recipe for cakiness.
Mistake 7: Choosing the Wrong Foundation Shade
When foundation doesn’t match your skin tone, it sits on top of your skin like a mask instead of blending in. Test foundation on your jawline in natural light, not on your hand or wrist. The right shade should disappear into your skin.
Quick Fixes for Specific Situations
Sometimes standard advice doesn’t cover every scenario. Here are solutions for specific cakey foundation problems:
Problem: Foundation Looks Great at Home but Cakey by Noon
Your office or workplace might have dry air from heating or air conditioning. Keep a hydrating mist at your desk and spritz your face every few hours. This refreshes your makeup and adds moisture back to your skin.
Problem: Foundation Cakes Around Your Nose and Mouth
These areas move a lot when you talk and eat, which can cause foundation to bunch up. Use less product in these areas and set with a light dusting of powder (just these spots, not your whole face). Also, make sure you’re not over-applying lip balm, which can make foundation slide around your mouth.
Problem: Foundation Cakes on Your Forehead
Your forehead might be slightly oilier than the rest of your face, even if you have dry skin. Use a mattifying primer just on your forehead before foundation. This creates a better base without drying out your whole face.
Problem: Foundation Looks Cakey in Photos But Fine in Person
Camera flashes can emphasize texture and make foundation look worse than it is. Avoid foundations with SPF when you know you’ll be photographed (SPF can cause flashback). Also, set your makeup with a finely-milled translucent powder that’s specifically designed to be camera-friendly.
Problem: Only Certain Patches Get Cakey
You probably have combination-dry skin, where some areas are drier than others. Adjust your routine by using extra moisturizer on the super dry spots and slightly less on the areas that are more normal. You can even use different foundations on different areas of your face.
Frequently Asked Questions
How long should I wait between moisturizer and foundation?
Wait at least 5 minutes after applying moisturizer before you apply primer or foundation. This gives your skin time to absorb everything properly. If you’re in a huge rush, blot your face gently with a tissue to remove any excess before moving to the next step, but waiting is always better.
Can I use a face oil under foundation?
Yes! Face oils are amazing for dry skin. Apply 2-3 drops after your moisturizer and before your primer. Let it sink in for a few minutes. The oil creates a smooth, hydrated base that helps foundation glide on beautifully. Just don’t use too much or your makeup will slide around.
Will powder make my dry skin look worse?
Powder can make dry skin look cakey if you use too much or apply it everywhere. The trick is to use powder very sparingly and only where you need it. A light dusting on your T-zone is usually enough. Or skip powder entirely and just use a setting spray instead.
How do I know if my foundation is too matte for my skin?
If your foundation looks flat, emphasizes every tiny line and texture, and starts to look cakey within an hour, it’s too matte. Foundations for dry skin should have some glow to them. Look for words like “luminous,” “radiant,” “dewy,” or “natural” on the label.
Should I exfoliate before applying foundation?
Not right before! Exfoliate 2-3 times a week at night, not in the morning before makeup. Fresh exfoliation can make your skin sensitive and slightly red, which isn’t a good base for foundation. Exfoliating regularly keeps your skin smooth, but give it at least 12 hours between exfoliating and applying foundation.
Can dry skin cause foundation to separate?
Yes! When your skin is extremely dry, it can actually absorb the moisturizing ingredients from your foundation, leaving just the pigment behind. This makes foundation look separated, patchy, and cakey. The solution is to hydrate your skin really well before applying any makeup.
Does expensive foundation work better for dry skin?
Not always. Some drugstore foundations are amazing for dry skin, while some luxury foundations can still be too matte or drying. Focus on the formula and ingredients, not the price tag. A $15 hydrating foundation can work better than a $60 matte one if you have dry skin.
How often should I change my beauty sponge?
Replace your beauty sponge every 3 months, or sooner if it starts to tear, smell weird, or develop stains that won’t come out. A fresh sponge applies makeup more smoothly and is more hygienic.
Can I mix foundation with moisturizer to make it more hydrating?
Absolutely! Mix a small amount of foundation with your moisturizer or a drop of facial oil on the back of your hand before applying. This dilutes the foundation, making it more hydrating and giving you a lighter coverage. It’s a great trick for very dry skin or casual days when you want barely-there makeup.
Why does my foundation look cakey only in certain spots?
Those spots are probably extra dry or have more texture. Pay special attention to those areas during your skincare routine. Use a bit more moisturizer there, and when applying foundation, use less product in those spots. Sometimes less is more, especially on problem areas.
Final Thoughts: You’ve Got This
Dealing with cakey foundation when you have dry skin is frustrating, I know. But the good news is this: once you understand why it’s happening and adjust your routine accordingly, the problem becomes totally manageable.
Remember, hydration is everything. Hydrate your skin before makeup, choose hydrating products, and use techniques that add moisture rather than strip it away. Your foundation should work with your skin, not against it.
Don’t expect perfection overnight. It might take a few tries to find the right products and perfect your technique. But stick with it. Small changes, like switching to a damp sponge or adding a facial oil to your routine, can make a huge difference.
Your skin is unique, and what works for someone else might not work for you. Feel free to mix and match these tips until you find your perfect combination. The most important thing is to pay attention to how your skin feels and looks, then adjust accordingly.
And remember: makeup is supposed to make you feel good, not stressed. If your foundation isn’t cooperating, it’s not your fault. You just need the right approach for your specific skin type.
Now go rock that flawless, dewy, non-cakey foundation. You deserve to feel confident in your makeup, and with these tips, you absolutely will.